概要
Springを学びなおすにあたり、Spring MVCでHello Worldしたのでその方法についてまとめた。
今回はアノテーションベースのBean定義方法で実装した。
Spring MVCの特徴
Springフレームワークの一部として提供されるWeb MVCフレームワークのこと。
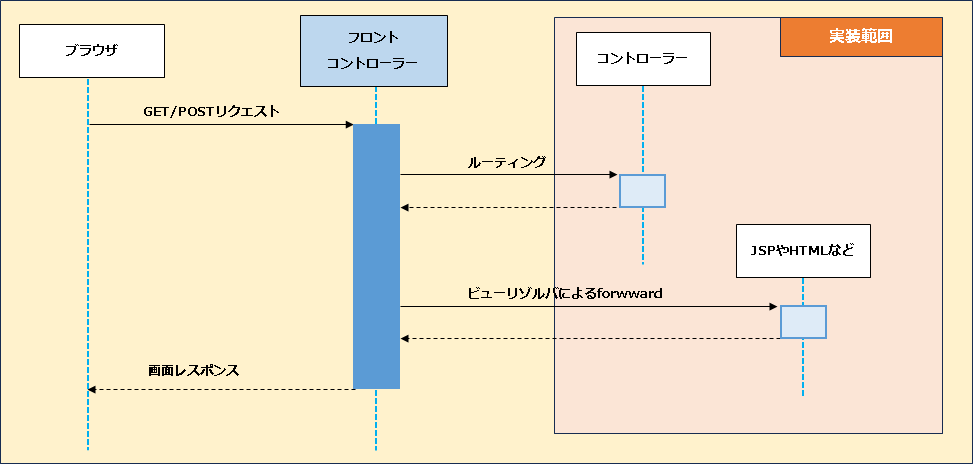
大きな特徴としては、以下のようにフロントコントローラーがリクエストとレスポンスを制御している。
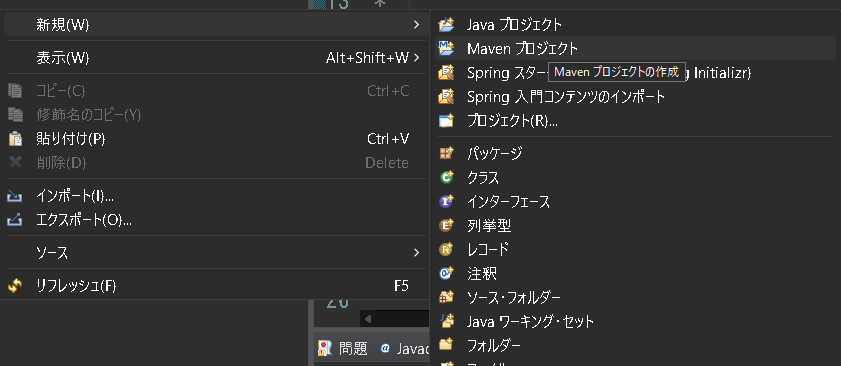
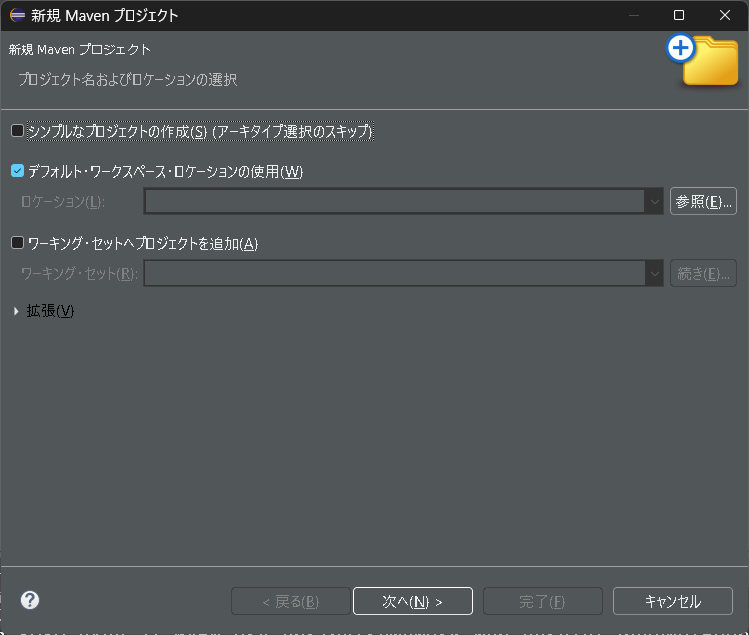
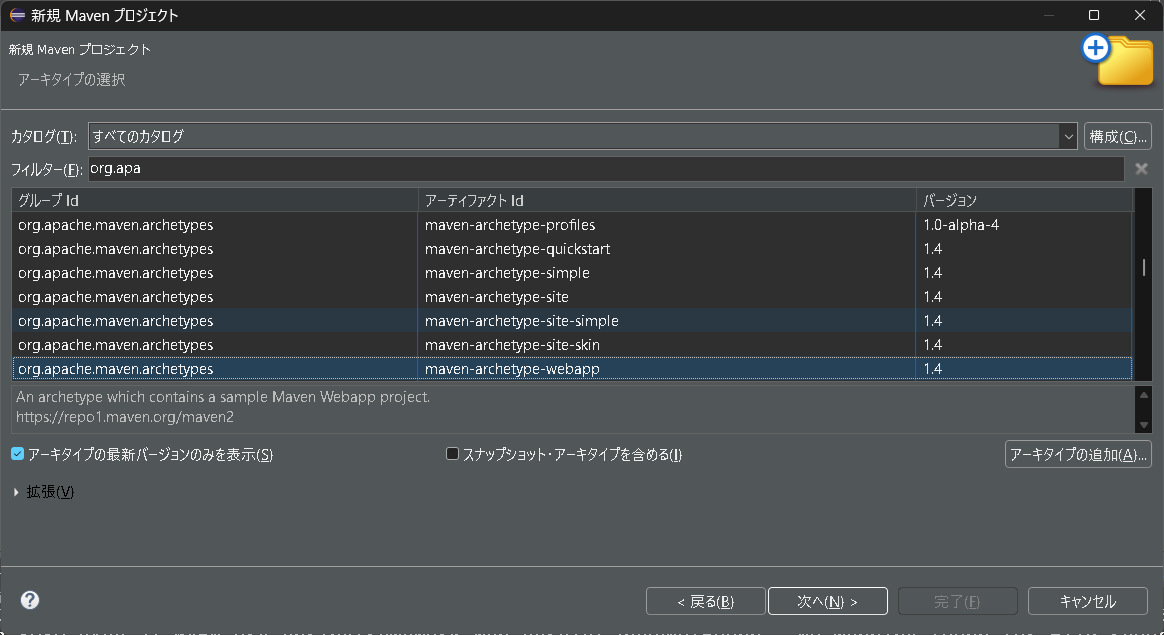
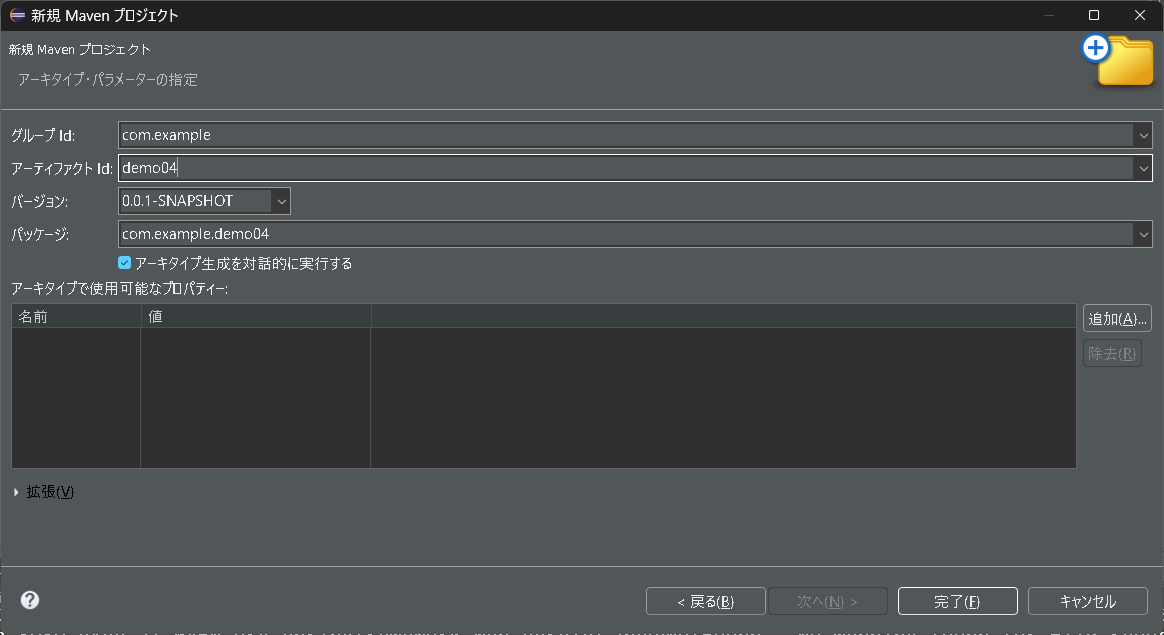
プロジェクトの作成
eclipseにて以下の手順でMavenプロジェクトを作成する。
準備
Spring MVCを利用するために各種必要な設定を行う。
ライブラリのセットアップ
Spring MVCと依存ライブラリをpom.xmlに設定する。
pom.xml
<project xmlns="http://maven.apache.org/POM/4.0.0"
	xmlns:xsi="http://www.w3.org/2001/XMLSchema-instance"
	xsi:schemaLocation="http://maven.apache.org/POM/4.0.0 http://maven.apache.org/maven-v4_0_0.xsd
						">

	<modelVersion>4.0.0</modelVersion>
	<groupId>com.example</groupId>
	<artifactId>demo04</artifactId>
	<packaging>war</packaging>
	<version>0.0.1-SNAPSHOT</version>
	<name>demo04 Maven Webapp</name>
	<url>http://maven.apache.org</url>

	<dependencyManagement>
		<dependencies>
			<dependency>
				<groupId>io.spring.platform</groupId>
				<artifactId>platform-bom</artifactId>
				<version>2.0.5.RELEASE</version>
				<type>pom</type>
				<scope>import</scope>
			</dependency>
		</dependencies>
	</dependencyManagement>

	<dependencies>
        <dependency>
            <groupId>org.apache.taglibs</groupId>
            <artifactId>taglibs-standard-jstlel</artifactId>
        </dependency>
		<dependency>
			<groupId>org.springframework</groupId>
			<artifactId>spring-webmvc</artifactId>
		</dependency>
		<dependency>
			<groupId>org.hibernate</groupId>
			<artifactId>hibernate-validator</artifactId>
		</dependency>
		<dependency>
			<groupId>org.slf4j</groupId>
			<artifactId>jcl-over-slf4j</artifactId>
		</dependency>
		<dependency>
			<groupId>ch.qos.logback</groupId>
			<artifactId>logback-classic</artifactId>
		</dependency>

	</dependencies>

	<build>
		<finalName>demo04</finalName>
		<pluginManagement>
			<plugins>
				<plugin>
					<artifactId>maven-compiler-plugin</artifactId>
					<configuration>
						<source>1.8</source>
						<target>1.8</target>
					</configuration>
				</plugin>
			</plugins>
		</pluginManagement>
	</build>
</project>
<dependencyManagement> <dependencies> <dependency> <groupId>io.spring.platform</groupId> <artifactId>platform-bom</artifactId> <version>2.0.5.RELEASE</version> <type>pom</type> <scope>import</scope> </dependency> </dependencies></dependencyManagement>dependencyManagementはプロジェクトで使用するライブラリ等のバージョンを一元管理する。
dependenciesにて追加したライブラリ等のバージョンを指定する必要がなくなり、一元管理されたバージョンが自動設定される。
上記により、バージョンの不整合等を防ぐことができる。
<dependency><groupId>org.springframework</groupId> <artifactId>spring-webmvc</artifactId></dependency>上記によりSpring MVCまわりのモジュールを使用できる。
その他のライブラリについては適宜必要なもの導入していく。
ContextLoaderListenerのセットアップ
WEBアプリケーションコンテキストを生成するためのContextLoaderListenerクラスをサーブレットコンテナ(Tomcat)に登録する。
上記により、Tomcat起動時にAppConfigクラスなどに定義したBeanクラスがSpringのDIコンテナによって初期化して使用できるようになる。
サービスやリポジトリ(プレゼンテーション層以外)のレイヤで使用するBeanを管理するために使用する。
Webアプリケーション用の設定(Config)ファイル
Beanを定義していく設定ファイルを作成する。
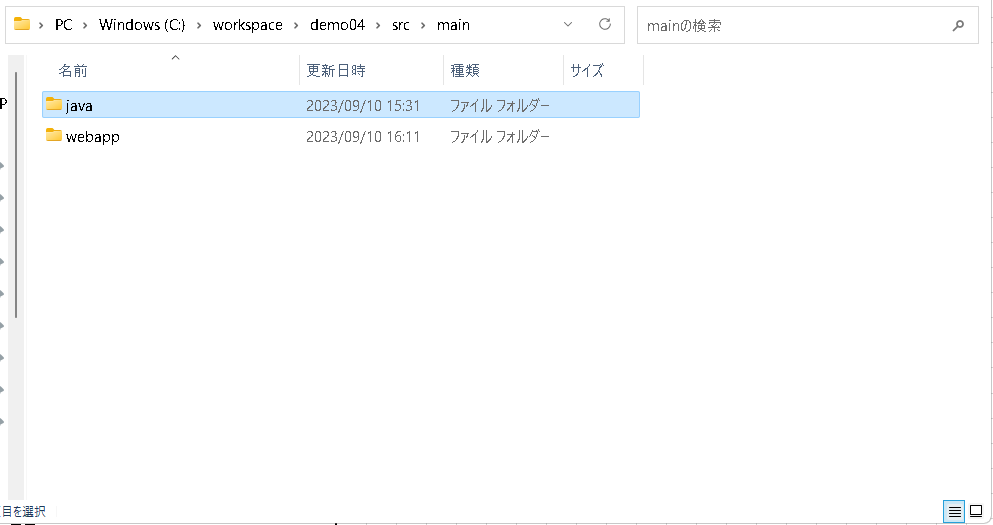
まずは欠損しているjavaフォルダを作成する。
任意のパッケージを作成して設定クラスを作成する。
AppConfig.java
package com.example.config;

import org.springframework.context.annotation.Configuration;

/**
 * DIコンテナに管理させるBean定義クラス
 */
@Configuration
public class AppConfig {
}
Webアプリケーションにて使用するBeanは上記Bean定義クラスに設定していく。
設定ファイルの登録
サーブレットコンテナ(Tomcat)起動時に、Webアプリケーション用の設定ファイルを参照させるため、web.xmlを修正する。
web.xmlはWebアプリケーションに関する動作(フィルターやタイムアウトなど)を集約するファイルになる。
web.xml
<listener>
	<listener-class>
		org.springframework.web.context.ContextLoaderListener
	</listener-class>
</listener>

<context-param>
	<param-name>contextClass</param-name>
	<param-value>
		org.springframework.web.context.support.AnnotationConfigWebApplicationContext
	</param-value>
</context-param>

<context-param>
	<param-name>contextConfigLocation</param-name>
	<param-value>com.example.config.AppConfig</param-value>
</context-param>
サーブレットコンテナにContextLoaderListenerを登録することで、Webアプリケーションの起動時にApplicationContextを初期化することができる。
ApplicationContextのタイプにAnnotationConfigWebApplicationContextを使用することで、Javaアノテーションを使用してBean定義や設定を行えるようにする。
DispatcherServletのセットアップ
DispatcherServletは以下のような重要な役割をもつ。
・コントローラーへのルーティング
・ビューの選択
・ビューのレンダリング(Httpレスポンス)
DispatcherServletはフロントコントローラーの役割をもつ。
リクエストをブラウザから受け取ると、URLに紐づくコントローラーのメソッドにディスパッチする。
また、コントローラーが返却した画面文字列を受け取り、対応する画面ファイルとマッピングさせる。
上記役割をもつDispatcherServletを使用するため、サーブレットコンテナに登録する。
サーブレットコンテナに登録することで、DispatcherServletはアプリケーション起動時にコントローラークラス等のBeanを初期化して管理することができる。
※DispatcherServletではプレゼンテーション層のBeanを管理して、ContextLoaderListenerではプレゼンテーション層より後ろのレイヤで使用するBeanを管理する。
※DispatcherServletとContextLoaderListenerの関係性は、親(ContextLoaderListener) - 子(DispatcherServlet)という関係になる。
子側で管理しているBeanから親側で管理しているBeanへの参照はできるが、親側で管理しているBeanから子側で管理しているBeanには参照できないので注意すること。(簡単に言うと、プレゼンテーション層からビジネスロジック層以降のBeanは見えるが、ビジネスロジック層のBeanからプレゼンテーション層のBeanは見えない)
DispatcherServlet用の設定(Config)ファイル
DispatcherServlet用の設定ファイルでは、URLに紐づくコントローラーメソッドにディスパッチするため、コントローラークラスをBean定義する。
また、ビューの選択を行うための設定も行う。
WebMvcConfig
package com.example.config;

import org.springframework.context.annotation.ComponentScan;
import org.springframework.context.annotation.Configuration;
import org.springframework.web.servlet.config.annotation.EnableWebMvc;
import org.springframework.web.servlet.config.annotation.ViewResolverRegistry;
import org.springframework.web.servlet.config.annotation.WebMvcConfigurerAdapter;

/**
 * Spring MVCの特定の設定を行う。
 *
 */
@Configuration
@EnableWebMvc
@ComponentScan("com.example.app")
public class WebMvcConfig extends WebMvcConfigurerAdapter {

    @Override
    public void configureViewResolvers(ViewResolverRegistry registry) {
        registry.jsp();
    }

}
上記をアノテーションを付与することで、Spring MVCの機能を使用できるようになる。
例えば、
・コントローラーが指定するテンプレートの画面ファイル名と画面ファイルをマッピングする(ビューリゾルバ)
…etc
上記アノテーションをつけることで、「com.example.app」パッケージ配下のコントローラーをスキャンする。
@Overridepublic void configureViewResolvers(ViewResolverRegistry registry) { registry.jsp();}上記により、コントローラーの返却するビュー名とWEB-INF配下のjspファイルをマッピングする。
設定ファイルの登録
サーブレットコンテナにDispatcherServletを登録する。
web.xml
<servlet>
	<servlet-name>app</servlet-name>
	<servlet-class>
		org.springframework.web.servlet.DispatcherServlet
	</servlet-class>
	<init-param>
		<param-name>contextClass</param-name>
		<param-value>
			org.springframework.web.context.support.AnnotationConfigWebApplicationContext
		</param-value>
	</init-param>
	<init-param>
		<param-name>contextConfigLocation</param-name>
		<param-value>com.example.config.WebMvcConfig</param-value>
	</init-param>
	<load-on-startup>1</load-on-startup>
</servlet>

<servlet-mapping>
	<servlet-name>app</servlet-name>
	<url-pattern>/</url-pattern>
</servlet-mapping>
上記の設定により、DispatcherServletがフロントコントローラーとして機能する。
「http://example.com/」などのアプリケーションルートURLとそのサブパスのURLにリクエストされると、DispatcherServletがURLに紐づくコントローラーのメソッドにルーティングする。
上記の記述では、WebMvcConfigのコンポーネントスキャンが走り、「com.example.app」パッケージ配下のコントローラーメソッドをマッピング対象にする。
CharacterEncodingFilterのセットアップ
リクエストとレスポンスにて日本語が文字化けしないよう、CharacterEncodingFilterをサーブレットコンテナに登録する。
web.xml
<filter>
	<filter-name>CharacterEncodingFilter</filter-name>
	<filter-class>
		org.springframework.web.filter.CharacterEncodingFilter
	</filter-class>
	<init-param>
		<param-name>encoding</param-name>
		<param-value>UTF-8</param-value>
	</init-param>
	<init-param>
		<param-name>forceEncoding</param-name>
		<param-value>true</param-value>
	</init-param>
</filter>

<filter-mapping>
	<filter-name>CharacterEncodingFilter</filter-name>
	<url-pattern>/*</url-pattern>
</filter-mapping>
CharacterEncodingFilterはSpringが提供するクラス。
URLパターンを「/*」とすることで、すべてのリクエストにフィルターをかけてUTF-8エンコーディングしている。
また、forceEncodingをtrueにすることでリクエストとレスポンス双方にてUTF-8エンコーディングを行う。
タグライブラリの設定
すべてのjspにタグライブラリを読み込む処理を行う。
include.jspにタグ情報を定義し、web.xmlにてすべてのjspの先頭でinclude.jspを含むように設定する。
尚、include.jspはWEB-INF配下に作成する。
include.jsp
<%@ taglib prefix="c" uri="http://java.sun.com/jsp/jstl/core" %>
<%@ taglib prefix="fmt" uri="http://java.sun.com/jsp/jstl/fmt" %>
<%@ taglib prefix="fn" uri="http://java.sun.com/jsp/jstl/functions" %>

<%@ taglib prefix="spring" uri="http://www.springframework.org/tags" %>
<%@ taglib prefix="form" uri="http://www.springframework.org/tags/form" %>
include.jspにて使用するタグライブラリをまとめて定義しておき、以下のweb.xmlにてまとめて参照させる。
web.xml
<jsp-config>
	<jsp-property-group>
		<url-pattern>*.jsp</url-pattern>
		<page-encoding>UTF-8</page-encoding>
		<include-prelude>/WEB-INF/include.jsp</include-prelude>
	</jsp-property-group>
</jsp-config>
最終的なweb.xml
最終的なweb.xmlは以下のかたちになる。
web.xml
<?xml version="1.0" encoding="UTF-8"?>
<web-app xmlns="http://java.sun.com/xml/ns/javaee"
	xmlns:xsi="http://www.w3.org/2001/XMLSchema-instance"
	xsi:schemaLocation="
      http://java.sun.com/xml/ns/javaee
      http://java.sun.com/xml/ns/javaee/web-app_3_0.xsd
    "
	version="3.0">

	<listener>
		<listener-class>
			org.springframework.web.context.ContextLoaderListener
		</listener-class>
	</listener>

	<context-param>
		<param-name>contextClass</param-name>
		<param-value>
			org.springframework.web.context.support.AnnotationConfigWebApplicationContext
		</param-value>
	</context-param>

	<context-param>
		<param-name>contextConfigLocation</param-name>
		<param-value>com.example.config.AppConfig</param-value>
	</context-param>

	<filter>
		<filter-name>CharacterEncodingFilter</filter-name>
		<filter-class>
			org.springframework.web.filter.CharacterEncodingFilter
		</filter-class>
		<init-param>
			<param-name>encoding</param-name>
			<param-value>UTF-8</param-value>
		</init-param>
		<init-param>
			<param-name>forceEncoding</param-name>
			<param-value>true</param-value>
		</init-param>
	</filter>

	<filter-mapping>
		<filter-name>CharacterEncodingFilter</filter-name>
		<url-pattern>/*</url-pattern>
	</filter-mapping>

	<servlet>
		<servlet-name>app</servlet-name>
		<servlet-class>
			org.springframework.web.servlet.DispatcherServlet
		</servlet-class>
		<init-param>
			<param-name>contextClass</param-name>
			<param-value>
				org.springframework.web.context.support.AnnotationConfigWebApplicationContext
			</param-value>
		</init-param>
		<init-param>
			<param-name>contextConfigLocation</param-name>
			<param-value>com.example.config.WebMvcConfig</param-value>
		</init-param>
		<load-on-startup>1</load-on-startup>
	</servlet>

	<servlet-mapping>
		<servlet-name>app</servlet-name>
		<url-pattern>/</url-pattern>
	</servlet-mapping>

	<jsp-config>
		<jsp-property-group>
			<url-pattern>*.jsp</url-pattern>
			<page-encoding>UTF-8</page-encoding>
			<include-prelude>/WEB-INF/include.jsp</include-prelude>
		</jsp-property-group>
	</jsp-config>

</web-app>
Hello World
Webアプリケーション開発を行うための準備が整ったので、Hello Worldを行う実装をする。
コントローラー
フロントコントローラーからディスパッチしてもらうコントローラーを実装する。
Demo04Controller.java
package com.example.app;

import org.springframework.stereotype.Controller;
import org.springframework.web.bind.annotation.RequestMapping;

@Controller
public class Demo04Controller {

	@RequestMapping("/index")
	public String index() {
		return "index";
	}
}
「http://localhost:8080/index」にリクエストされると、上記indexメソッドがDispatcherServletから呼ばれる。
文字列”index”を返却することで、ビューリゾルバがWEB-INF配下の「index.jsp」を呼び出す。
JSP
WEB-INF配下にindex.jspを作成する。
index.jsp
<html>
<body>
	<h2>Hello World!!!!</h2>
</body>
</html>
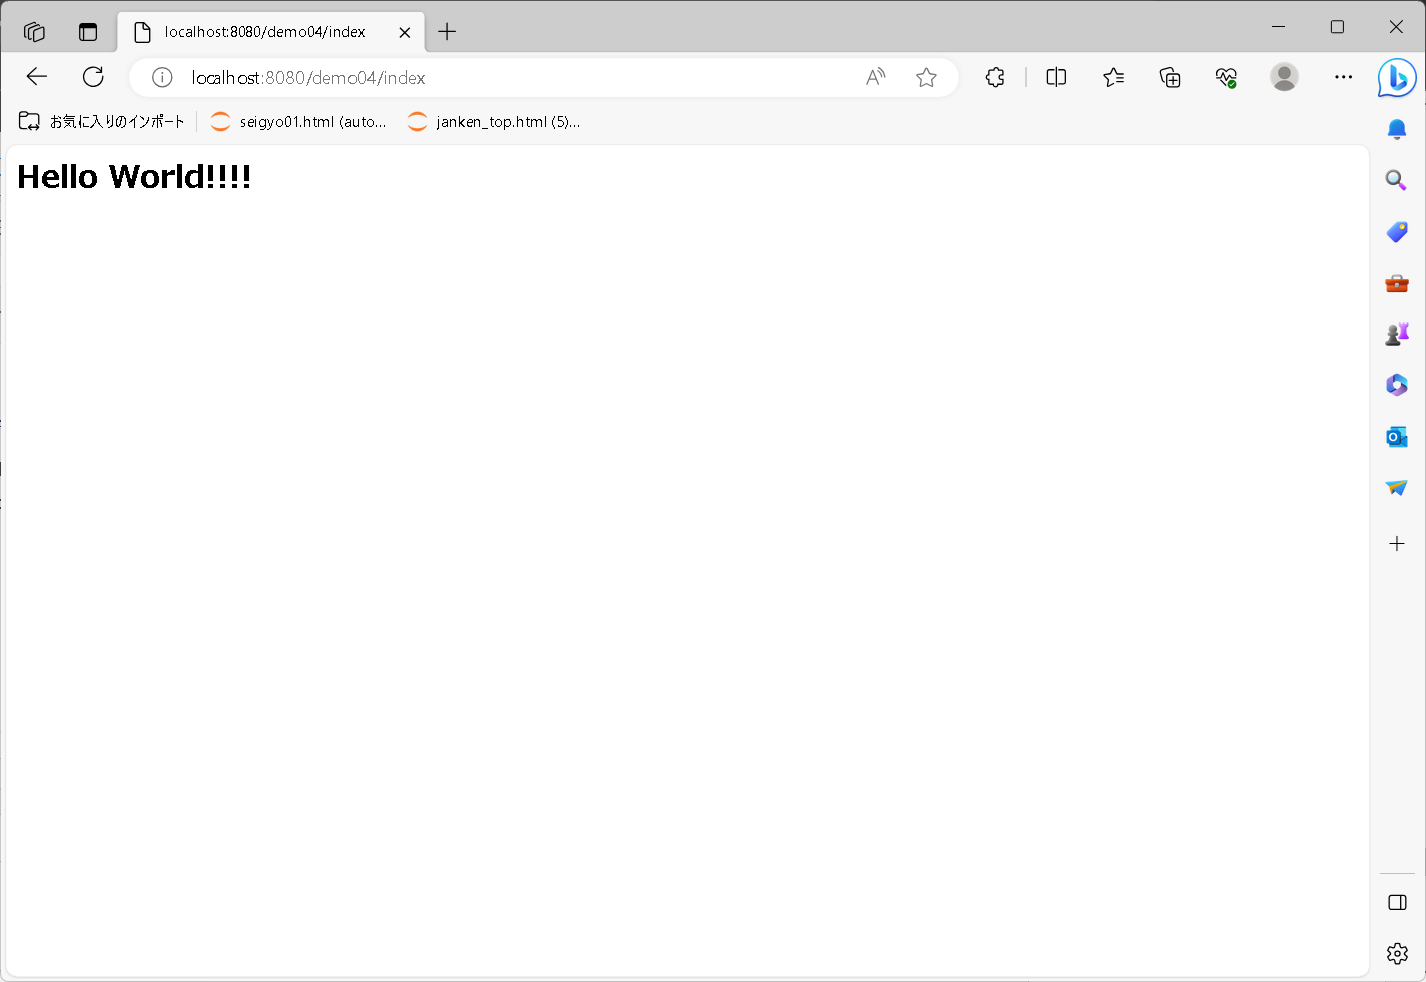
画面表示
以上で準備が整ったので、Tomcatに作成したプロジェクトを追加してサーバー起動する。
「http://localhost:8080/index」にリクエストすると、Hello Worldできる。