概要
これから数回にかけてREST APIについて学んだことを載せていく。
今回はREST APIの仕組みとプロジェクト作成方法について紹介する。
尚、RESTとは何かということについては取り扱わない。
仕組み
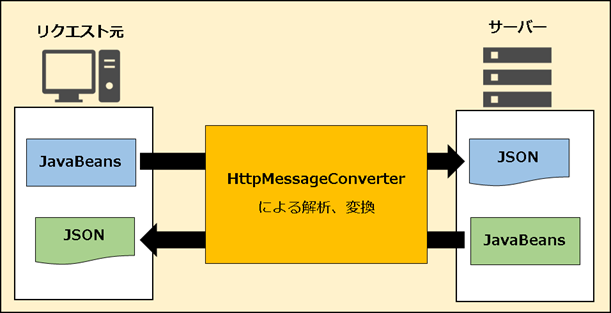
前提として、作成するREST APIアプリはJSON形式でクライアントと疎通を行うこととする。
クライアントサーバー間が疎通する全体像は以下のようになる。
補足
サーバー(REST API)とリクエスト元(RestTemplateなど)を使用した疎通のポイントは以下となる。
クライアントとサーバー疎通
クライアントとサーバーは JSON 形式で疎通を行う。
クライアント側がJSONでリクエストを送信すると、サーバー側はそのJSONを解析してJavaBeansに変換する。
サーバー側がレスポンスを返す際には、JavaBeansをJSONに変換してクライアント側に送信する。
HttpMessageConverterの役割
JSONとJavaBeansの変換処理を担うのが、org.springframework.http.converter.HttpMessageConverterインターフェースとなる。
HttpMessageConverterは、リクエストのJSONをJavaオブジェクトに変換したり、レスポンスのJavaオブジェクトをJSONに変換する。
HttpMessageConverterの利用
HttpMessageConverterは、spring-web(spring-webmvcに内包)モジュールに含まれている。
HttpMessageConverterの実装クラスをカスタマイズすれば、返却するJSONを整形したりも可能。
今回は特にカスタマイズはしない。
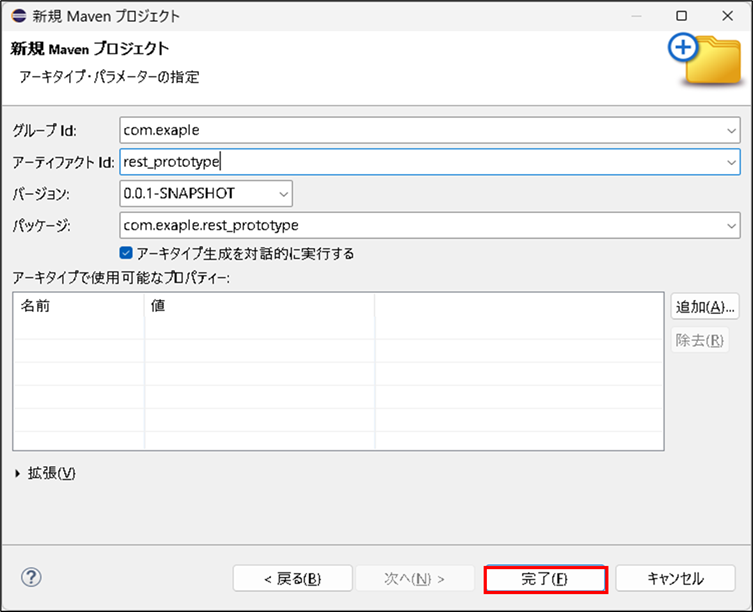
プロジェクト作成
Spring MVCにてREST APIを作成するためのプロジェクト作成方法について紹介する。
基本的には以下のMavenセットアップの内容で作成は可能だが、不要な項目(jspなどのクライアント側の設定)があるため改めて記載する。
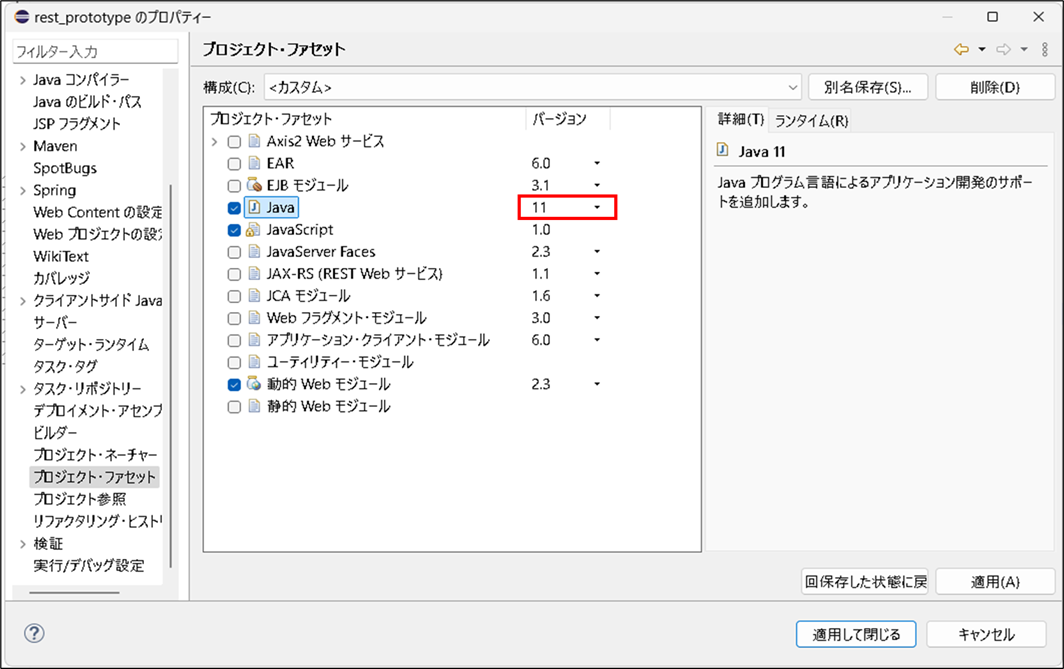
※Javaのバージョンは11を使用する
概要 Spring MVCフレームワークを使用して開発を進める際、Mavenプロジェクトの基本的なセットアップ方法についてまとめた。 前提 プロジェクトの具体的な作成方法については以下に記載。 [siteca[…]

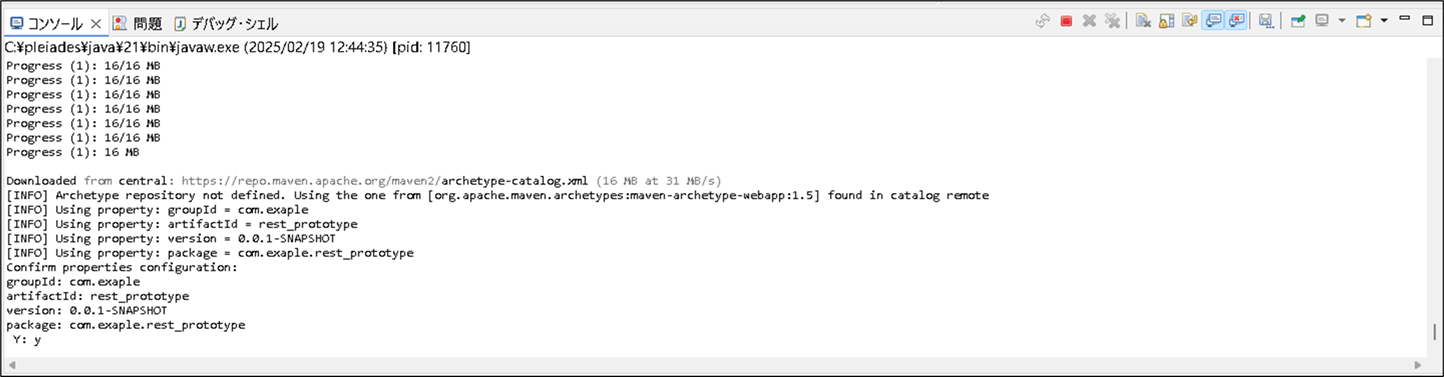
Mavenプロジェクト作成
Springアプリに必要なライブラリを簡単にインストール管理できるMavenを使用してプロジェクトを作成する。
以下の流れで作成する。
ファイル構成
準備するREST APIアプリの最終的なファイル構成は以下となる。
尚、今後必要に応じてファイル追加等は行っていく。
ファイル構成
rest_prototype ⇒作成したプロジェクト
│
└─src
    └─main
         ├─java
         │   └─com
         │       └─example
         │              └─rest_prototype
         │                          ├─biz
         │                          │  └─service
         │                          │       └─ResourceService.java ⇒ リソースの操作を行う
         │                          └─web
         │                              ├─controller ⇒ コントローラー層を格納するパッケージ(ここに今後追加していく)
         │                              │
         │                              └─resources
         │                                   └─Resource.java ⇒ クライアントに返却するリソースクラス
         │
         │─resources
         │    ├─META-INF ⇒プロパティ、設定ファイル等を格納するフォルダ
         │    │    └─spring ⇒Bean定義ファイルを格納するフォルダ
         │    │         ├─springMVCContext.xml ⇒WebアプリケーションコンテキストのDIコンテナが参照するBean定義
         │    │         └─applicationContext.xml ⇒ルートアプリケーションコンテキストのDIコンテナが参照するBean定義
         │    │
         │    └─logback.xml ⇒ログ設定
         │
         └─webapp
               └─WEB-INF
                     └─web.xml
pom.xml
以下のように設定する。(設定後は必要に応じてmaven installによりライブラリ資材をダウンロードする)
※今回はJavaのバージョンを11としている。
pom.xml
<project xmlns="http://maven.apache.org/POM/4.0.0"
	xmlns:xsi="http://www.w3.org/2001/XMLSchema-instance"
	xsi:schemaLocation="http://maven.apache.org/POM/4.0.0 http://maven.apache.org/maven-v4_0_0.xsd">
	<modelVersion>4.0.0</modelVersion>
	<groupId>com.exaple</groupId>
	<artifactId>rest_prototype</artifactId>
	<packaging>war</packaging>
	<version>0.0.1-SNAPSHOT</version>
	<name>rest_prototype Maven Webapp</name>
	<url>http://maven.apache.org</url>
	<properties>
		<project.build.sourceEncoding>UTF-8</project.build.sourceEncoding>
		<maven.compiler.source>11</maven.compiler.source><!-- javaのバージョン -->
		<maven.compiler.target>11</maven.compiler.target><!-- javaのバージョン -->
	</properties>
	<dependencies>
		<!-- ゲッターセッターの記述を省略できるlombokモジュール -->
		<dependency>
			<groupId>org.projectlombok</groupId>
			<artifactId>lombok</artifactId>
			<version>1.18.22</version>
			<scope>provided</scope> <!--providedスコープが指定されたライブラリは、コンパイル時にのみ必要とされる。 -->
		</dependency>
		<!-- Webアプリケーション用モジュール -->
		<dependency>
			<groupId>javax.servlet</groupId>
			<artifactId>javax.servlet-api</artifactId>
			<version>4.0.1</version>
			<scope>provided</scope>
		</dependency>
		<!-- Spring-MVCに必要なモジュール -->
		<dependency>
			<groupId>org.springframework</groupId>
			<artifactId>spring-webmvc</artifactId>
			<version>5.1.20.RELEASE</version>
		</dependency>
		<!-- ログ出力に必要なモジュール -->
		<dependency>
			<groupId>ch.qos.logback</groupId>
			<artifactId>logback-classic</artifactId>
			<version>1.4.11</version>
		</dependency>
		<dependency>
			<groupId>org.slf4j</groupId>
			<artifactId>slf4j-api</artifactId>
			<version>2.0.9</version>
		</dependency>
		<!-- LocalDateをJSON変換するためのモジュール -->
		<dependency>
			<groupId>com.fasterxml.jackson.datatype</groupId>
			<artifactId>jackson-datatype-jsr310</artifactId>
			<version>2.15.2</version>
		</dependency>
	</dependencies>
	<build>
		<finalName>rest_prototype</finalName>
	</build>
</project>
web.xml
ルートアプリケーションコンテキスト、Webアプリケーションコンテキストを初期化する。
以下のように設定する。
web.xml
<?xml version="1.0" encoding="UTF-8"?>

<web-app>
	<!-- WebアプリケーションコンテキストのDIコンテナ作成 -->
	<servlet>
		<servlet-name>app</servlet-name>
		<servlet-class>org.springframework.web.servlet.DispatcherServlet
		</servlet-class>
		<init-param>
			<param-name>contextConfigLocation</param-name>
			<param-value>classpath:/META-INF/spring/springMVCContext.xml
			</param-value>
		</init-param>
		<load-on-startup>1</load-on-startup>
	</servlet>
	<servlet-mapping>
		<servlet-name>app</servlet-name>
		<url-pattern>/</url-pattern>
	</servlet-mapping>

	<!-- ルートアプリケーションコンテキストのDIコンテナ作成 -->
	<listener>
		<listener-class>
			org.springframework.web.context.ContextLoaderListener
		</listener-class>
	</listener>
	<context-param>
		<param-name>contextConfigLocation</param-name>
		<param-value>classpath:/META-INF/spring/applicationContext.xml
		</param-value>
	</context-param>
</web-app>
logback.xml
必要に応じてファイルを作成する。
コンソールにログを表示させたい場合、以下のように設定する。
logback.xml
<?xml version="1.0" encoding="UTF-8"?>
<configuration>
	<!-- コンソール出力の設定 -->
	<appender name="STDOUT"
		class="ch.qos.logback.core.ConsoleAppender">
		<encoder>
			<pattern>%d{yyyy-MM-dd HH:mm:ss} [%thread] %-5level %logger{36} - %msg%n</pattern>
		</encoder>
	</appender>

	<!--  JNDI のエラーログを抑制 -->
	<logger name="org.springframework.jndi" level="WARN" />

	<!-- ファイル出力の設定 -->
<!-- 	<appender name="FILE" class="ch.qos.logback.core.FileAppender">
		<file>C:/workspace/prototype/logs/app.log</file>
		<encoder>
			<pattern>%d{yyyy-MM-dd HH:mm:ss} [%thread] %-5level %logger{36} -
				%msg%n</pattern>
		</encoder>
	</appender> -->

	<!-- ログレベルの設定 -->
	<root level="INFO">
		<appender-ref ref="STDOUT" />
		<!-- <appender-ref ref="FILE" /> -->
	</root>
</configuration>
applicationContext.xml
ルートアプリケーションコンテキストが管理するBean定義ファイル。
以下のように設定する。
applicationContext.xml
<?xml version="1.0" encoding="UTF-8"?>
<beans xmlns="http://www.springframework.org/schema/beans"
	xmlns:xsi="http://www.w3.org/2001/XMLSchema-instance"
	xmlns:context="http://www.springframework.org/schema/context"
	xsi:schemaLocation="
         http://www.springframework.org/schema/beans
         http://www.springframework.org/schema/beans/spring-beans.xsd
         		http://www.springframework.org/schema/context
		http://www.springframework.org/schema/context/spring-context-3.1.xsd">

	<!-- コンポーネントスキャン -->
	<context:component-scan base-package="com.example.rest_prototype.biz" />
</beans>
springMVCContext.xml
Webアプリケーションコンテキストが管理するBean定義ファイル。
以下のように設定する。
springMVCContext.xml
<?xml version="1.0" encoding="UTF-8"?>
<beans xmlns="http://www.springframework.org/schema/beans"
       xmlns:xsi="http://www.w3.org/2001/XMLSchema-instance"
       xmlns:mvc="http://www.springframework.org/schema/mvc"
       xmlns:context="http://www.springframework.org/schema/context"
       xsi:schemaLocation="http://www.springframework.org/schema/beans
         http://www.springframework.org/schema/beans/spring-beans.xsd
         http://www.springframework.org/schema/mvc
         http://www.springframework.org/schema/mvc/spring-mvc.xsd
         http://www.springframework.org/schema/context
         http://www.springframework.org/schema/context/spring-context.xsd
       ">

	<!-- アノテーションを有効にする -->
    <mvc:annotation-driven />

	<!-- コンポーネントを表すアノテーションがついたクラスをスキャンする -->
    <context:component-scan base-package="com.example.rest_prototype.web" />

</beans>
Resource.java
クライアント側のURIリクエストに応じて返却するリソースオブジェクト。
以下のように定義している。
Resource.java
package com.example.rest_prototype.web.resources;

import java.time.LocalDate;

import com.fasterxml.jackson.annotation.JsonFormat;

import lombok.AllArgsConstructor;
import lombok.Data;
import lombok.NoArgsConstructor;
import lombok.ToString;

/**
 * REST APIにて返却するリソースオブジェクト
 */
@Data
@AllArgsConstructor
@NoArgsConstructor
@ToString
public class Resource {
	/** ID */
	private String id;
	/** 名前 */
	private String name;
	/** とある日付 */
	@JsonFormat(pattern = "yyyy-MM-dd")
	private LocalDate hogeDate;
}
ResourceService.java
リソースの操作を行うビジネスロジッククラス。
DBを用意しない代わりに、マップ情報を定義している。
今後マップ操作を行うメソッドを追加していく。
ResourceService.java
package com.example.rest_prototype.biz.service;

import java.time.LocalDate;
import java.util.Map;
import java.util.concurrent.ConcurrentHashMap;

import org.springframework.stereotype.Service;

import com.example.rest_prototype.web.resources.Resource;

@Service
public class ResourceService {

	/** DBの代わりに仮実装 */
	private static Map<String, Resource> tmpDbMap = new ConcurrentHashMap<>();

	/**
	 * 初期化(仮想DB)
	 */
	static {
		var dto1 = new Resource("1", "りんご", LocalDate.of(2025, 2, 1));
		var dto2 = new Resource("2", "ごりら", LocalDate.of(2024, 6, 5));
		var dto3 = new Resource("3", "らっぱ", LocalDate.of(2023, 5, 10));

		// 初期化
		tmpDbMap.put(dto1.getId(), dto1);
		tmpDbMap.put(dto2.getId(), dto2);
		tmpDbMap.put(dto3.getId(), dto3);
	}

}
Javaバージョンの設定
pom.xmlのJavaバージョンに合わせて、プロジェクトで使用するJavaのバージョンを設定する。
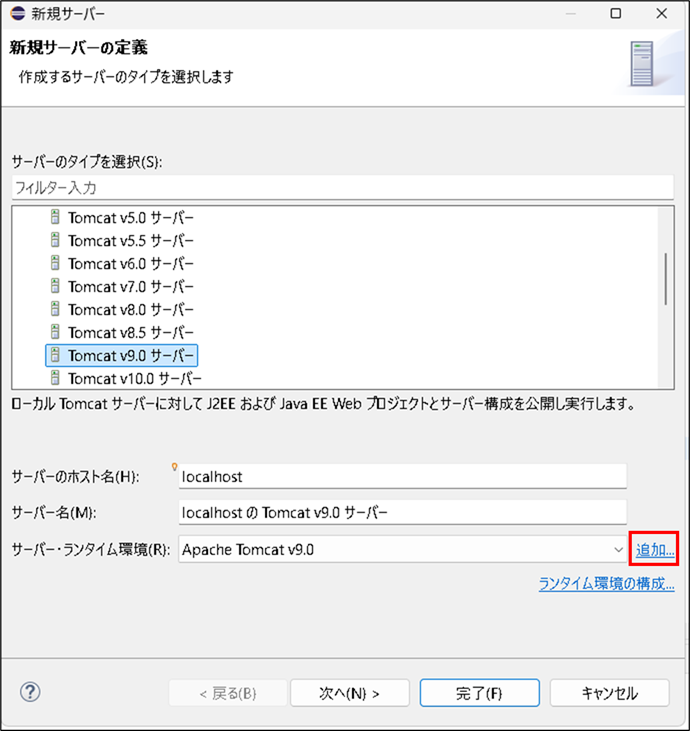
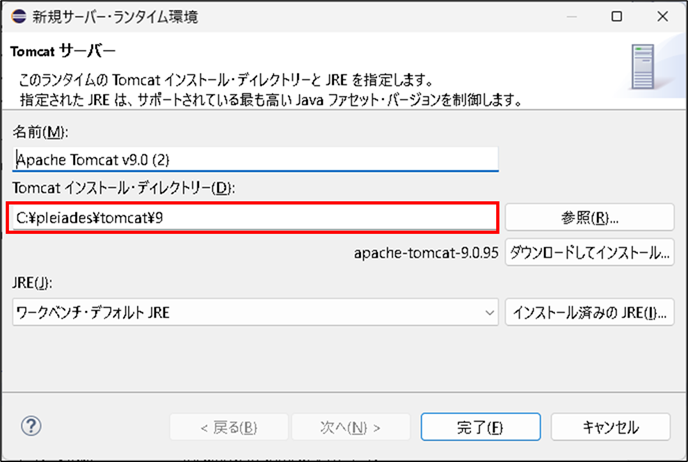
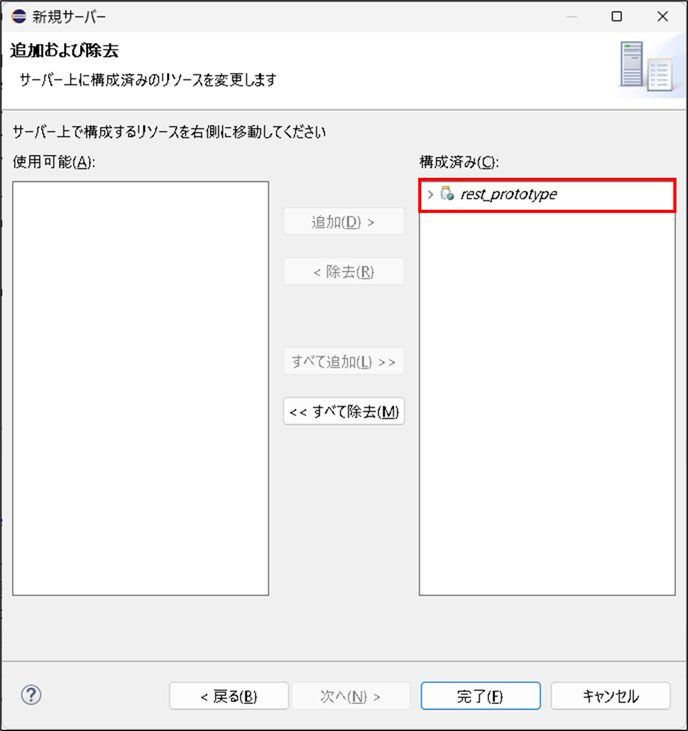
サーバー追加
作成したプロジェクトをTomcatに追加する。
以下の流れでサーバーを起動してエラーがなければ、REST APIアプリを作成するためのプロジェクトの準備は完了となる。
※Pleiadesに備え付けのTomcatで起動可能なTomcat9を使用した