概要
REST APIアプリを作成し、GET通信を行う方法についてまとめた。
※以下の記事の続きとなる。
概要 これから数回にかけてREST APIについて学んだことを載せていく。 今回はREST APIの仕組みとプロジェクト作成方法について紹介する。 尚、RESTとは何かということについては取り扱わない。 仕組み […]

事前準備
サービスクラスにリソースを返却するメソッドを追加する。
サービスクラス
キーに紐づくリソースの取得を行うfindメソッドを追加する。
ResourceService.java
package com.example.rest_prototype.biz.service;

import java.time.LocalDate;
import java.util.Map;
import java.util.concurrent.ConcurrentHashMap;

import org.springframework.stereotype.Service;

import com.example.restprototype.web.resources.Resource;

@Service
public class ResourceService {

	/** DBの代わりに仮実装 */
	private static Map<String, Resource> tmpDbMap = new ConcurrentHashMap<>();

	/**
	 * 初期化(仮想DB)
	 */
	static {
		var dto1 = new Resource("1", "りんご", LocalDate.of(2025, 2, 1));
		var dto2 = new Resource("2", "ごりら", LocalDate.of(2024, 6, 5));
		var dto3 = new Resource("3", "らっぱ", LocalDate.of(2023, 5, 10));

		// 初期化
		tmpDbMap.put(dto1.getId(), dto1);
		tmpDbMap.put(dto2.getId(), dto2);
		tmpDbMap.put(dto3.getId(), dto3);
	}

	/**
	 * IDに紐づくリソースを取得
	 * @param id
	 * @return
	 */
	public Resource find(String id) {
		return tmpDbMap.get(id);
	}
}
基本的なGET通信
GETリクエストに紐づくハンドラメソッドをコントローラーに作成し、REST API クライアントから動作確認を行う。
コントローラークラス
URIにパスパラメータを設定し、パラメータに該当するリソースを返却する。
Rest01Controller.java
package com.example.rest_prototype.web.controller.rest01;

import org.springframework.beans.factory.annotation.Autowired;
import org.springframework.stereotype.Controller;
import org.springframework.web.bind.annotation.GetMapping;
import org.springframework.web.bind.annotation.PathVariable;
import org.springframework.web.bind.annotation.ResponseBody;

import com.example.rest_prototype.biz.service.ResourceService;
import com.example.rest_prototype.web.resources.Resource;

@Controller
public class Rest01Controller {
	/** ビジネスロジック */
	@Autowired
	private ResourceService service;

	/**
	 * パスパラメータに対応したリソースを返却する
	 * @param id
	 * @return
	 */
	@GetMapping(value = "rest01/{id}")
	@ResponseBody
	public Resource get(@PathVariable String id) {
		// IDをキーにリソース取得
		var res = service.find(id);

		return res;
	}

}
GETリクエストを受け付けるアノテーション。
「id」という名前の変数で、パスパラメータを取得するURLテンプレートをvalueに指定している。
概要 Spring MVCにてクライアント側からGETまたはPOSTリクエストを行ってパラメータを取得する方法についてまとめた。 前提 Mavenプロジェクトの作成方法と基本的な画面疎通については以下を参照。 […]
メソッドの戻り値を、レスポンスに直接設定可能にするアノテーション。
Resourceオブジェクトを返却することで、
SpringのメッセージコンバーターがオブジェクトをJSON形式に変換して 、クライアント側にJSON情報が返却される。
※実際に動作するメッセージコンバーターは、JavaBeansとJSONを相互変換を担うMappingJackson2HttpMessageConverterとなる
動作確認
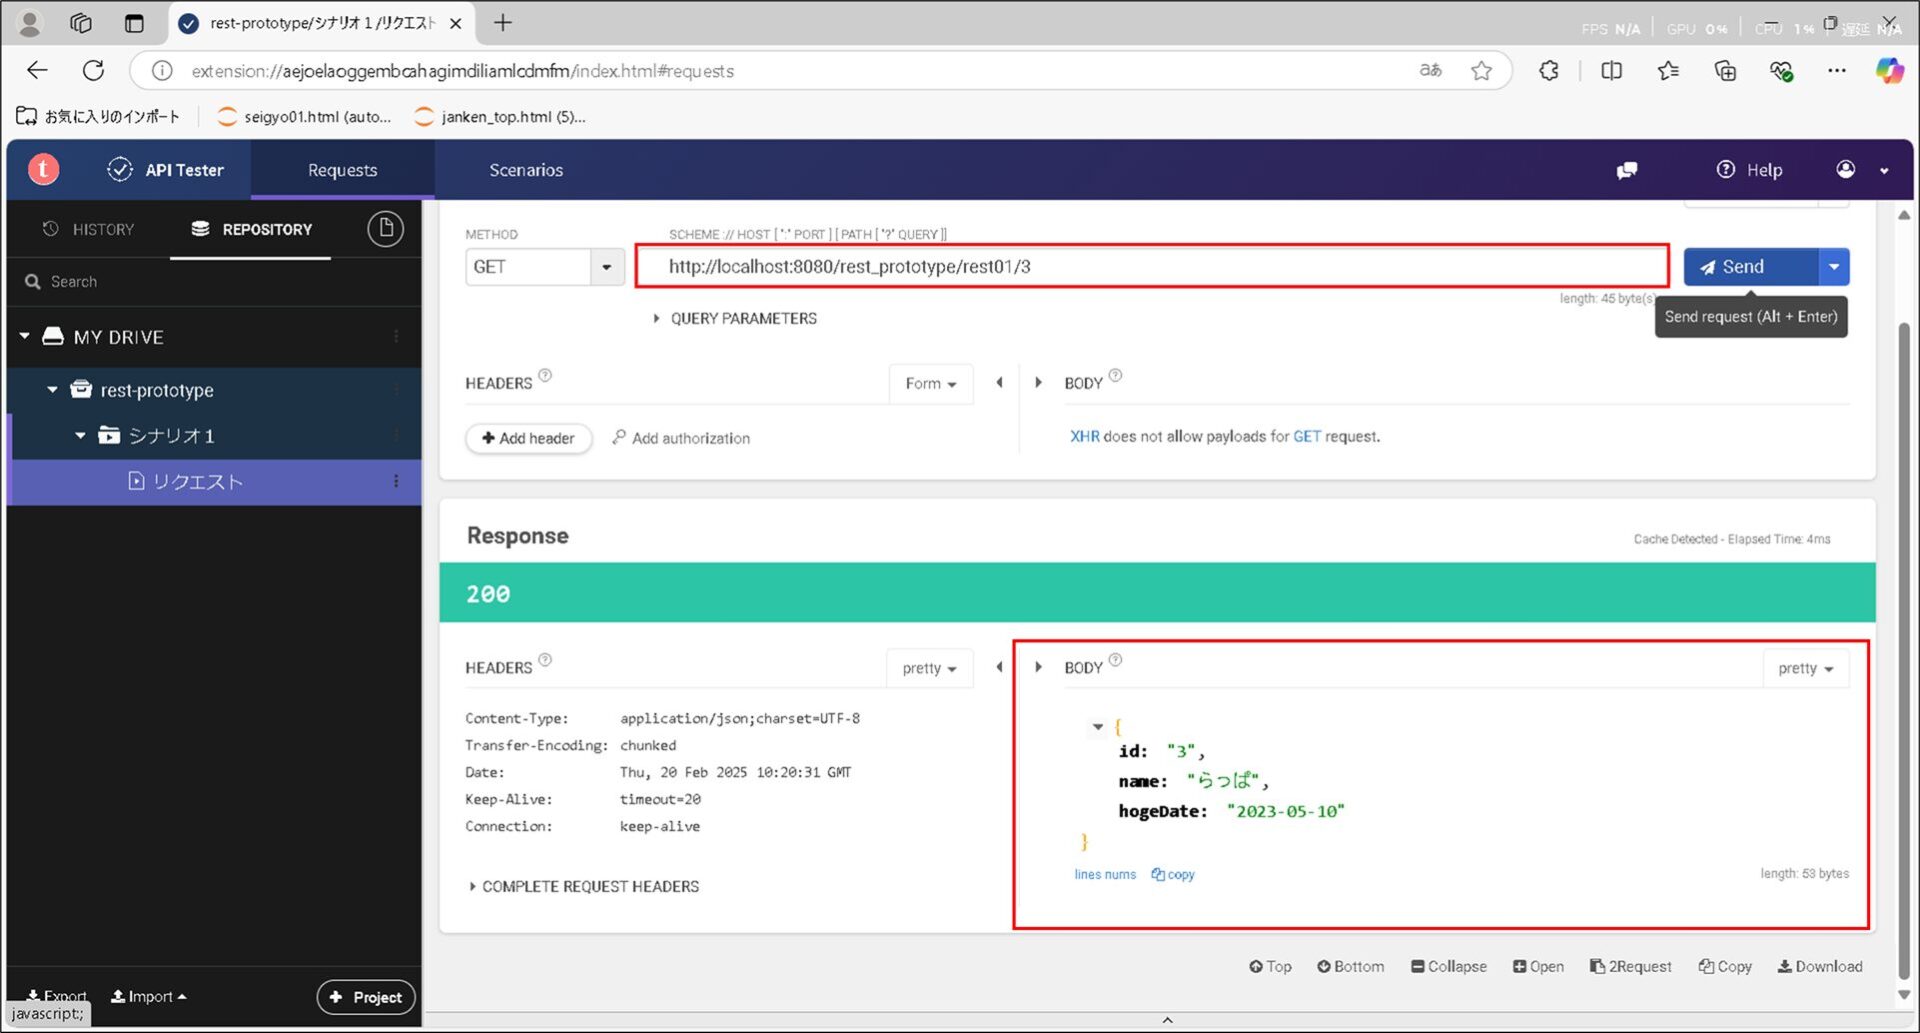
サーバーを起動して、Talend API Testerを使用して動作確認を行う。
Talend API Testerの使用方法については以下を参照。
概要 GUIのツールを使用してシンプルにREAT APIアプリにリクエストを送りたいと思い、Talend API Testerを使用してみた。 いろいろと便利だったため、基本的な使用方法について簡単にまとめた。 事[…]

GETリクエスト送信
GETリクエストを送信し、指定したIDに紐づくリソースオブジェクトがJSON形式になって返却された。
まとめ
☑ リクエストハンドラに@ResponseBodyを指定することで、レスポンスボディに直接オブジェクトを設定できる
☑ メッセージコンバーターが動作してJavaBeansをJSON 形式に変換してくれる
☑ MappingJackson2HttpMessageConverterがJavaBeansとJSONの相互変換を担う