概要
REST APIアプリを作成し、JSONを使用してPUT通信を行う方法についてまとめた。
概要 これから数回にかけてREST APIについて学んだことを載せていく。 今回はREST APIの仕組みとプロジェクト作成方法について紹介する。 尚、RESTとは何かということについては取り扱わない。 仕組み […]
事前準備
リソース更新用の処理をサービスクラスに追加する。
サービスクラス
リソース更新用のupdateメソッドを追加する。
ResourceService.java
package com.example.rest_prototype.biz.service;

import java.time.LocalDate;
import java.util.Map;
import java.util.concurrent.ConcurrentHashMap;

import org.springframework.stereotype.Service;

import com.example.rest_prototype.web.resources.Resource;

@Service
public class ResourceService {

	/** DBの代わりに仮実装 */
	private static Map<String, Resource> tmpDbMap = new ConcurrentHashMap<>();

	/**
	 * 初期化(仮想DB)
	 */
	static {
		var dto1 = new Resource("1", "りんご", LocalDate.of(2025, 2, 1));
		var dto2 = new Resource("2", "ごりら", LocalDate.of(2024, 6, 5));
		var dto3 = new Resource("3", "らっぱ", LocalDate.of(2023, 5, 10));

		// 初期化
		tmpDbMap.put(dto1.getId(), dto1);
		tmpDbMap.put(dto2.getId(), dto2);
		tmpDbMap.put(dto3.getId(), dto3);
	}

	/**
	 * IDに紐づくリソースを取得
	 * @param id
	 * @return
	 */
	public Resource find(String id) {
		return tmpDbMap.get(id);
	}

	/**
	 * リソース登録
	 * @param resource
	 */
	public void create(Resource resource) {
		tmpDbMap.put(resource.getId(), resource);
	}

	/**
	 * リソース更新
	 * @param resource
	 */
	public void update(Resource resource) {
		tmpDbMap.put(resource.getId(), resource);
	}
}
基本的なPUT通信
PUTリクエストに紐づくハンドラメソッドをコントローラーに作成し、REST API クライアントから動作確認を行う。
コントローラークラス
クライアントから送信されたJSONをリクエスト用オブジェクトで取得し、リソース更新を行う。
Rest03Controller.java
package com.example.rest_prototype.web.controller.rest03;

import org.slf4j.Logger;
import org.slf4j.LoggerFactory;
import org.springframework.beans.factory.annotation.Autowired;
import org.springframework.http.HttpStatus;
import org.springframework.stereotype.Controller;
import org.springframework.web.bind.annotation.PathVariable;
import org.springframework.web.bind.annotation.PutMapping;
import org.springframework.web.bind.annotation.RequestBody;
import org.springframework.web.bind.annotation.ResponseStatus;

import com.example.rest_prototype.biz.service.ResourceService;
import com.example.rest_prototype.web.input.ResourceReq;
import com.example.rest_prototype.web.resources.Resource;

@Controller
public class Rest03Controller {
	/** ロガー */
	private static final Logger logger = LoggerFactory.getLogger(Rest03Controller.class);

	/** ビジネスロジック */
	@Autowired
	private ResourceService service;

	/**
	 * PUTリクエストされたリソースを更新する
	 * @param id
	 * @param req
	 */
	@PutMapping(value = "rest03/{id}")
	@ResponseStatus(HttpStatus.NO_CONTENT)
	public void put(@PathVariable String id, @RequestBody ResourceReq req) {
		// リソース更新
		var resource = new Resource(id, req.getName(), req.getHogeDate());
		service.update(resource);

		logger.info("★★更新結果★★" + service.find(id));
	}

}
PUTリクエストを受け付けるアノテーション。
レスポンスのHTTPステータスを「204(NO CONTENT)」に設定するアノテーション。
204ステータスは、リクエストは成功したが、レスポンスボディは返却しないという意味。
一般的に、PUT通信またはDELETE通信で返却される。
動作確認
サーバーを起動して、Talend API Testerを使用して動作確認を行う。
Talend API Testerの使用方法については以下を参照。
概要 GUIのツールを使用してシンプルにREAT APIアプリにリクエストを送りたいと思い、Talend API Testerを使用してみた。 いろいろと便利だったため、基本的な使用方法について簡単にまとめた。 事[…]

PUTリクエスト送信
PUTリクエストを送信し、204ステータスが返却された。
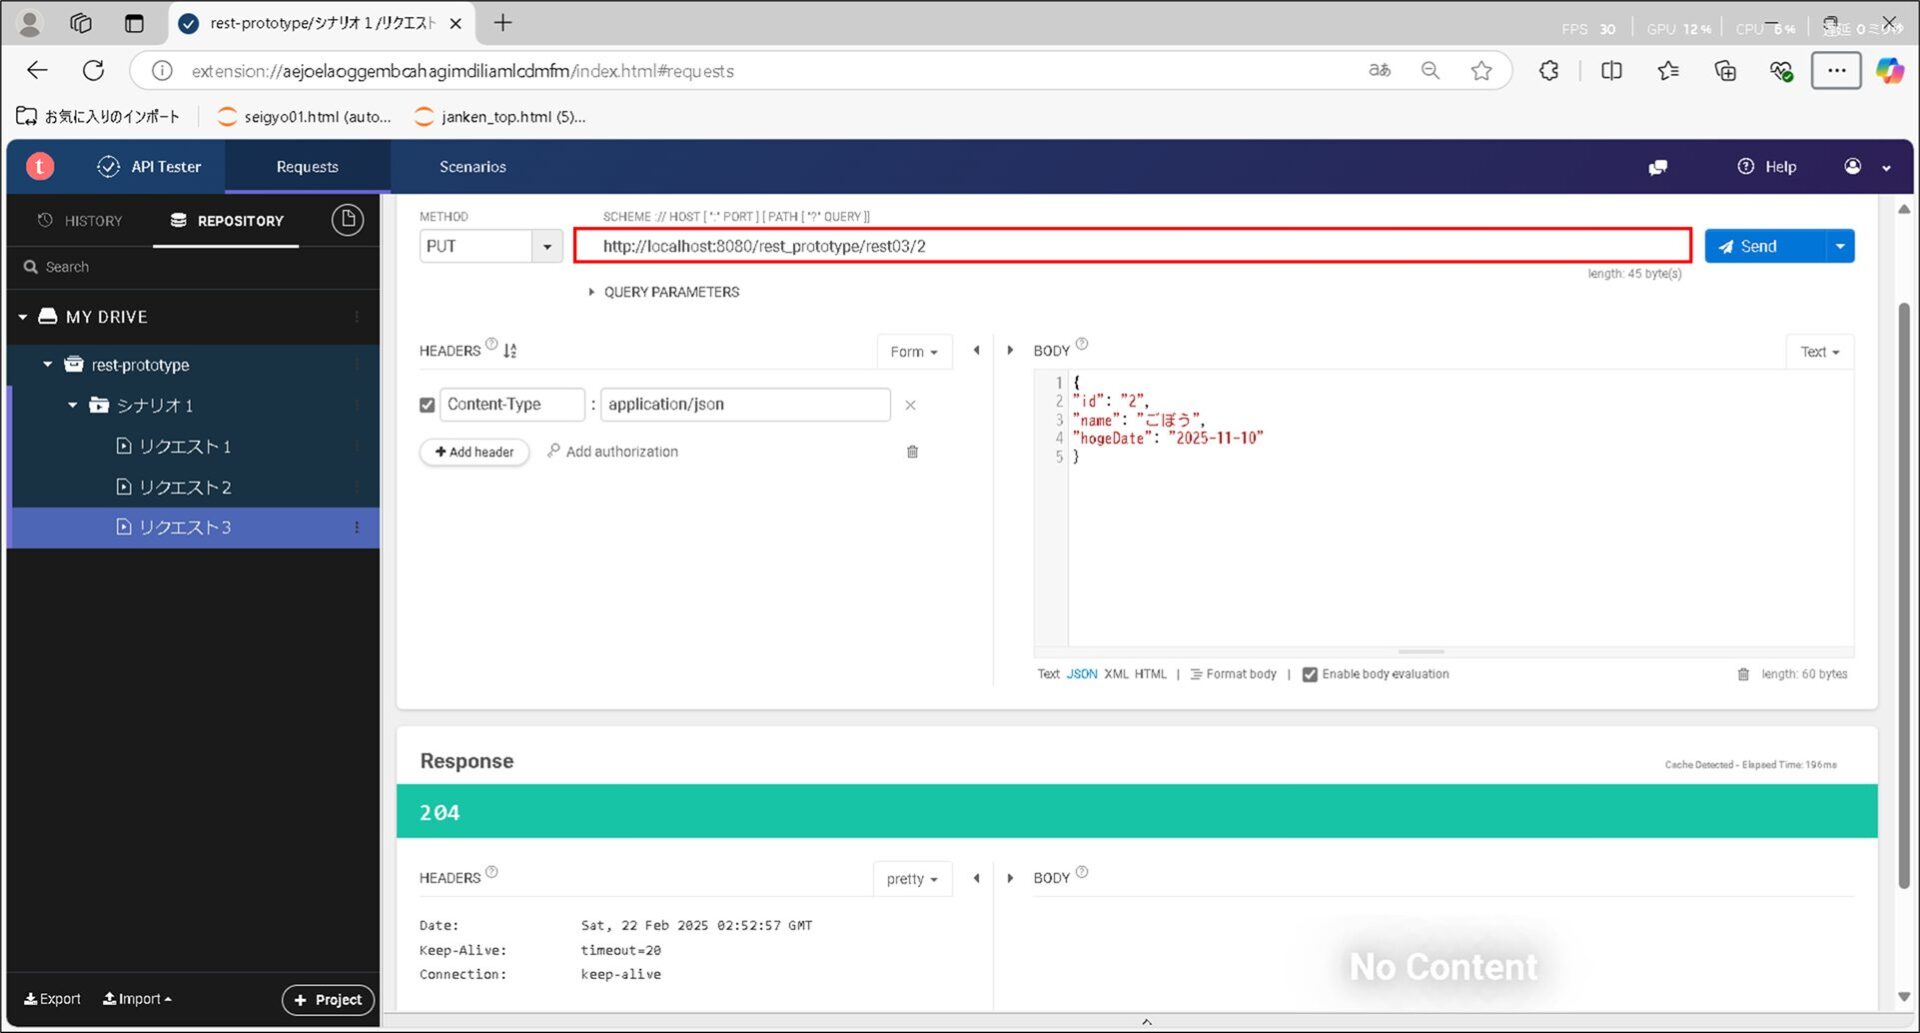
ログ出力内容は以下。
コンソールログ
★★更新結果★★Resource(id=2, name=ごぼう, hogeDate=2025-11-10)
まとめ
☑ @PutMappingを付与することで、PUTリクエストを受け付ける
☑ @ResponseStatusで指定したHTTPステータスをレスポンスに指定できる
☑ HTTPステータス204は、「リクエストは成功したが、レスポンスボディは返却しない」という意味